The fabrication work intended for a shipping container project can have an impact on the selection. None of the used containers are perfect and are likely to have rust, dents, and holes. If a significant portion of the body is expected to be cut-out, then you can be a little more tolerant towards selecting a container that has significant damage only on that part. This can be used to negotiate a better deal. In this post, I will cover the various considerations related to selection and fabrication.
Selection of used container
Patchwork 
Container yard
At the most basic level of selection, if you do not have any idea about how you might fabricate it, you can request a container without any ‘patchwork’ — the steel pieces seam welded to cover any holes in the body. It is best to physically check the container at the location to ensure that you get the best one possible. You can use this checklist while inspecting the prospects:
- The containers must be wind and watertight (‘WWT’). This is the main condition of a ‘seaworthy’ container for cargo transport. Containers with patchwork can also be WWT. So specify a no ‘patchwork’ condition if that is the requirement.
- Minimal rust on the walls. Although some amount of rust is unavoidable, check that the rust has not corroded too deep into the wall thickness. The corner posts are much thicker and so is less of an issue.
- Check if there is a chemical smell or some indications of chemical spillage on the marine plywood floorboard. Avoid these containers.
- The age and specialty of a container can also play a part in the rate. Expect to pay almost double or triple for a single-use/minimal use container. Special containers like those with side opening doors or high cube(extra height of 9.5 ft vs 8.5ft) are also much more costly because of rarity. The containers I used were regular 20ft containers, manufactured in 2007, and about 12 years old at the time I purchased them. These containers had no patchwork and were in good condition. Typically containers are de-commissioned from cargo usage after about 12 years.
- Check for large dents and confirm with the dealer about fixing it. Most dents can be fixed to a manageable level and are usually taken care of by the dealer himself at the cost price of the used container.
- The container door is very strong and heavy, so if you plan on using it, make sure that the door opens without much difficulty. Check for bends in the vertical latch bars that can make it difficult to lock the container. This can be fixed into usable shape but it still may be tighter than required.

Bends and holes 
Container 1 (TSB) 

Container 2 (TSB)
Fabrication
It may be wise to get most of the fabrication done through the container dealers who usually have connects with a fabrication team. Their know-how can go a long way in getting the job done well and fast. You can gauge the experience of the team fabricating the container by asking for whatsapp images of past work, and a catalogue of designs they can execute. All works mentioned herein were done at the container yard in Chennai.
I finalized the deal of purchasing the container only after the foundation was ready and all pre-arrival preparations for the arrival were made. The fabrication work included :
Cut-Outs
These are the sections of the container which have to be cut like the door, windows, ventilator fan slots, and openings to join another container. In my conversations with the dealer, the windows and doors were the simple ‘pop-out’ style, meaning they retain the container look on the exterior when they are closed. I gave the team my design of where I wanted the windows, door, and the joining point into the 2nd container. The work involved:
- Cutting the steel section out. A gas cutter is the go-to tool used. For small sections, an angle grinder can be used, but involves more time, effort, several cutting discs and the possibility of burning out the device after prolonged use.
- Reinforcing the cut-out frame by seam welding steel angle pipes. The actual window or door is made by welding the cut section onto a rectangular pipe frame which fits into the angle pipe frame of the cut-out void.
- A rain cover welded above the top edge of the doors and windows.
- Simple latches, welded for securely shutting the doors and windows.

Electricals
Ideally for all works apart from the cut-outs, you do not want to destroy the integrity of the container walls. This can cause more rust issues than necessary and might also reduce the resale value. So it is better not to drill screws to secure the electrical switchboards and pipes. Again I relied on the experience of the team and just gave them a detail about where I wanted the light, fan, plug, and switches. Some points about this work:
- Since the containers were intended to be used as a shop with possibly varying setups, the plug points were made accessible in the middle and at the end of the container. There were 3 plug points in each container.
- I decided to go with 2 light points and 1 fan point per container. The lights were spaced equidistant along the length of the ceiling such that each light covered the same amount of throw. There was also an outside light under the door rain cover of container 2.
- The ventilator fans were placed at the top corner of each of the containers. If you are aware of the sidewall which produces most heat due to the sun, then you can plan to have the fans positioned so that the hot air can be evacuated most efficiently.
- All the pipe brackets and the switch/ plug boxes were welded onto the container wall. I requested for them to be at a height of 3.5 ft from the floor, accounting for the size of the windows and ease of access.
- There was a trip switch (MCB) for each of the container.
- Since the 2 containers had to be joined, the internal connection between them was done in the post-arrival work.

Flooring
The containers come with a ‘marine plywood’ floorboard which is strong and durable. This is usually fumigated with pesticides to protect the cargo. This may be toxic for prolonged exposure but with an old container, it is likely that the potency of the pesticide treatment has reduced to insignificant levels.
There may also be a risk of chemical spillage from the cargo movement. Inspecting the container at the yard may indicate this through smell or stains. When you check a few containers you may be able to detect harmful smells.
In both cases, the main risk is the off-gassing of toxic fumes. Along with the considerations mentioned above, the risk can be managed by sticking a vinyl floor sheet over the entire floorboard which creates a non-breathable barrier. You can also consider laying tiles or some other flooring material over this.
Since the containers had to to be transported and then joined in an ‘L’ configuration, the vinyl sheets were applied at my location, post-arrival. Any dips and cracks in the floorboard were filled with plaster of Paris first, so that the vinyl sheet could be laid smoothly.

Filling out the undulations 
Applying the vinyl sheet
Painting
The paint used for cargo shipping containers are strongly treated to endure the harsh and corrosive conditions at sea and protect the cargo inside from pest attacks. They may have also been used to transport toxic cargo.
Hence the existing paint has to be removed and the container has to be re-painted. A good quality paint job can greatly improve the lifespan of the container. Hence, I got this done by the Chennai team as well. They applied a primer and 2 coats of paint.
After the containers arrived at my location, they had to be welded together and the newly welded parts had to be painted.

The red containers of TSB 
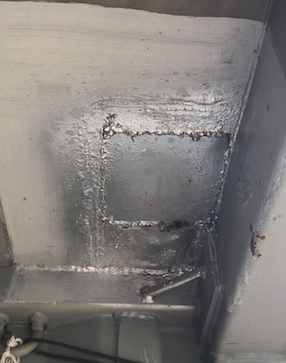
Newly welded plate
freshly painted
Conclusion
Fabrication costs can be significant and you must factor this accordingly for your project. Here I have only mentioned the different kinds of work involved. Communicating with the dealer, negotiating prices, and deciding the type of work to be done, will be covered in a different post. In my case, some of the fabrication work had to be done post-arrival which I will mention in a different post.